

Learning the Ollie is often one of the first big milestones in skateboarding. It looks simple from a distance, yet once we try it, we quickly realize it brings together timing, balance, and coordinated movement in a very integrated way.
At the beginning, the Ollie may seem like just a small jump with the board. But as we practice, we start to understand that it involves the whole body working in sequence, from foot placement to lift-off to control in the air.
When we break it down step by step, the process becomes much easier to follow. In this guide, we go through each part clearly so we can gradually build confidence and develop a smoother, more natural motion over time.
<h3>Setting Up the Body and Board</h3>
Before starting the Ollie, we focus on a stable and relaxed setup. Our shoulders stay aligned with the skateboard, and our upper body remains loose instead of stiff. We keep our vision forward with a soft focus on the board.
Foot placement is very important. The front foot sits between the middle area and the front trucks section of the board. The back foot rests on the tail, slightly angled outward. This position helps us prepare for both balance and control during movement.
Weight distribution is also key. Most of the body weight stays over the front foot, while the back foot stays light. This allows us to react quickly when we begin the motion of the Ollie.
<h3>Creating the Pop Action</h3>
The first active step in the Ollie is the “pop,” where we generate upward energy from the board. We lower our body slightly by bending the knees, storing energy like a spring.
The back foot is responsible for the main action here. Instead of pushing with force from the entire leg, we use a quick and controlled motion from the ankle area. The energy travels from the leg into the tail of the board.
The key is direction. The back foot moves straight downward toward the tail, creating a clean and sharp contact. This action helps the board react upward while we prepare to jump.
<h3>Jumping and Timing Together</h3>
As the back foot taps the tail, we also begin to rise upward with the whole body. This is not a separate movement but a combined action. The jump and the pop happen almost at the same time.
The front leg starts lifting upward toward the upper body, while the back leg extends briefly before leaving the board. This separation creates space for the board to rise with us.
Timing is very important in the Ollie. When both actions connect smoothly, the movement feels light and controlled instead of forced or delayed.
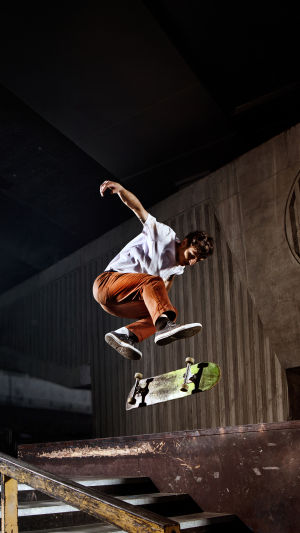
<h3>Guiding Ollie in the Air</h3>
Once we are in the air, the front foot becomes the main control point of the Ollie. It lifts upward and slightly forward, guiding the board’s shape in motion.
The ankle naturally rotates so the outer edge of the foot stays in contact with the board surface. This helps keep the board stable and close to our body.
As the front leg rises higher, it begins to guide the front part of the board forward. The movement forms a smooth arc, almost like drawing a curve in the air. This arc shape is what gives the Ollie its height and flow.
A longer and smoother arc helps us gain better control, while a short movement can limit stability.
<h3>Landing with Balance and Control</h3>
As the Ollie reaches its highest point, we prepare for landing. Both feet move toward the ends of the board to create balance.
We aim to bring the board level before touching the ground. This helps us land evenly and smoothly. When contact happens, we bend the knees slightly to absorb the impact.
A calm landing is just as important as the jump itself. When we stay relaxed, the entire Ollie feels more connected and natural.
<h3>Practice Tips to Improve Ollie</h3>
To improve the Ollie step by step, we can focus on several simple practices:
- First, build balance by riding comfortably and staying stable on the board. This helps us understand body control before jumping.
- Second, repeat the tail tap motion without full jumps. This helps us feel how the board responds to pressure and timing.
- Third, practice small jumps off the board to reduce hesitation. It allows us to get used to upward movement without pressure.
- Fourth, work on coordination between both feet. When the front and back actions match rhythm, the Ollie becomes smoother and more natural.
We can also practice slower versions of the Ollie, focusing on each stage individually before combining everything.
<h3>Growing Through Practice</h3>
Learning the Ollie is a gradual process that develops through repetition and patience. Instead of focusing only on height or speed, we benefit more from understanding timing, balance, and flow.
Lykkers, as we continue practicing the Ollie, we will notice small improvements appearing step by step. Each attempt builds more confidence, and over time, the movement becomes part of our natural riding style.
Keep practicing, stay relaxed, and enjoy the process of learning the Ollie as it grows from a simple jump into a smooth and expressive movement.


