

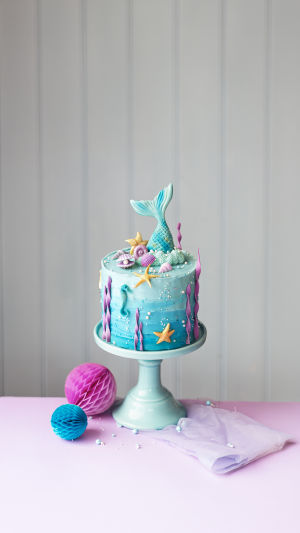
This mermaid cake is the kind of dessert that brightens up a party table. It is bright, playful, and full of layered color, yet it is built from familiar cake basics.
The cake uses a soft vanilla base paired with creamy buttercream, then turns that simple foundation into something that looks like it came straight from the sea.
The decoration may seem detailed at first glance, but the process is manageable when broken into clear steps. With a little planning, you can create a cake that feels special without making the baking day stressful.
<h3>Ingredients</h3>
For the vanilla cake, you will need:
- 2 and 1/2 cups all-purpose flour
- 2 and 1/2 teaspoons baking powder
- 1/2 teaspoon salt
- 3/4 cup unsalted butter, softened
- 1 and 3/4 cups granulated sugar
- 5 large egg whites
- 1/2 cup sour cream
- 1 tablespoon pure vanilla extract
- 1/2 cup whole milk
- 1/2 cup buttermilk
For the buttercream, you will need:
- 1 and 1/2 cups unsalted butter, softened
- 5 and 1/2 cups confectioners' sugar
- 1/3 cup heavy cream
- 1 and 1/2 teaspoons pure vanilla extract
- A pinch of salt
For decorating, you will need:
- Gel food coloring in ocean shades such as teal, aqua, and purple
- Mermaid tail toppers, sprinkles, or candy pearls, if desired
<h3>How to Make the Cake Layers</h3>
The batter comes together in two bowls, and the layers bake in these steps:
1. Prepare your cake pans and preheat the oven to 350°F.
2. Whisk the flour, baking powder, and salt together in one bowl.
3. In another bowl, beat the butter and sugar until light and creamy.
4. Add the egg whites, then mix in the sour cream and vanilla.
5. Add the dry ingredients, alternating with the milk and buttermilk, and mix until just combined.
6. Divide the batter evenly between the pans.
7. Bake until the centers are set and a toothpick comes out clean.
8. Let the cakes cool completely.
Cooling matters because warm layers make frosting difficult and can cause the cake to slip.
<h3>Make the Buttercream</h3>
The frosting is easy to adjust as you go, so check the texture before coloring it:
1. Beat the softened butter until smooth.
2. Gradually add the confectioners' sugar.
3. Mix in the heavy cream, vanilla, and salt until fluffy and spreadable.
4. Add a little cream if it feels too thick, or more confectioners' sugar if it seems too soft.
5. Divide the buttercream into separate bowls and tint each portion with a different gel color.
Keeping the shades varied helps create the underwater effect, especially when you blend them lightly instead of mixing them into one uniform tone.
<h3>Assemble and Decorate</h3>
Chilling between coats keeps the frosting neat, so build the cake in stages:
1. Level the cake layers if needed.
2. Stack them with buttercream between each layer.
3. Apply a thin crumb coat, a light first layer that traps loose crumbs, and chill until the surface firms up.
4. Spread or pipe the final layer of frosting in your chosen colors.
5. Soften the edges where colors meet with a spatula.
6. Pipe shell-like swirls and wave patterns with piping bags fitted with star tips.
7. Add decorations near the top or around the sides.
Do not overcrowd the design. A few thoughtful touches usually look better than too many extras.
<h3>Helpful Notes and Tips</h3>
Use room-temperature ingredients for a smoother batter and more even baking. Gel coloring works better than liquid coloring because it gives strong color without thinning the frosting.
If you want to work ahead, bake the cake layers in advance and wrap them well before frosting day. Chilled layers are often easier to stack and decorate neatly.
Store leftover cake covered in the refrigerator, and let slices sit briefly before serving so the texture softens again. For a party theme, change the toppers or color shades to make the final look your own.